WP Customizer’s API provides an interface especially for developers to customize the appearance and behavior of their theme and extensions. That was introduced back in WP 3.4 version. It allows to modify theme settings and shows its changes in real-time as you do any modifications. It enables you to control the site from many aspects such as widgets, menus, color, layout and more.
WordPress has many built-in Customize objects. Besides, if want some extra objects you can choose to add a custom panel, section, setting, control.
But in this article, we will get a deeper insight on Custom Control only. Let’s start with creating control. Customizor API gives many Controls By default. Here are some inbuilt core and control that we can use.
1) Basic Control Type
2) Advanced Control Object
3) Custom Control
Core provides several existing control types elements with any allowed type (see below)
Basic Control Types
Core provides several built-in Control Types elements with any allowed type. Core inbuilt control the most important parameter is its Type in which the ui depended. (see below)
text, checkbox, textarea, radio, select, dropdown-pages, email, url, number, hidden, date etc.
Advanced control Objects
Customize API also gives features of several inbuilt custom Control Object.
WP_Customize_Color_Control
WP_Customize_Upload_Control
WP_Customize_Image_Control
WP_Customize_Header_Image_Control
WP_Customize_Background_Image_Control
WP_Widget_Area_Customize_Control
WP_Widget_Form_Customize_Control
Custom Control
If your requirement not fulfilling from these existing controls then you can build your own custom controls and use them. To create custom control we can follow these steps:
a) Create class
b) Render the control’s content
c) Add Setting and Control
To form custom controls you need to create class and extend the WP_Customize_Control class on your own, adding some of our own functions and enrich your custom control. Controls must be added to a section before they will be displayed.
$wp_customize->add_control(new Custom_control_object($wp_customize, 'control_name',
    array(
         /* labels and additional elements goes here */
    )
));
Let’s explore WP_Customize_Control class and understand the custom control by a simple example of Separator control.
Separator control
Create class: Creating class is important
if (class_exists('WP_Customize_Control')) {
    class Separator_Custom_control extends WP_Customize_Control{
         public $type = 'separator';
    }
}
Render content: render_content function inside the define class. Render function allows you to generate the HTML structure of our control and to be overridden without having to rewrite the wrapper in $this::render().
/* Custom Separator */
if (class_exists('WP_Customize_Control')) {
   class Separator_Custom_control extends WP_Customize_Control{
      public $type = 'separator';

      // Render the control's content.
      public function render_content(){
        // Insert 'hr' tag
      }
   }
}
Add a setting and control: Use custom control class in control.
$wp_customize->add_setting('separator_setting');
$wp_customize->add_control(new Separator_Custom_control($wp_customize,
   'separator_setting', array(
   'settings' => 'separator_setting',
   'section' => 'custom_control_separator',
)));
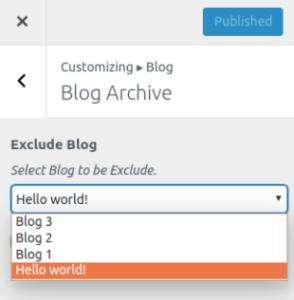
Blog Dropdown
Let’s take another example of Blog Dropdown. Define class with render Content and add it into Control and setting just like we did in the previous example.
if (class_exists('WP_Customize_Control')) {
	class Custom_control_blog_dropdown extends WP_Customize_Control{
		public $type = 'exclude_blog';

		// Render the control's content.
		public function render_content(){
		$exclude_blog = new WP_Query( array(
		'post_type'   => 'post',
		'post_status' => 'publish',
		'orderby'     => 'date',
		'order'       => 'DESC'
		)); ?>
                <span class="customize-control-title"><?php echo esc_html( $this->label ); ?></span>
		<span class="description customize-control-description"><?php echo esc_html($this->description ); ?></span>
		<select <?php $this->link(); ?>>
		<?php while( $exclude_blog->have_posts() ) {
		    $exclude_blog->the_post();
	            echo "<option " . selected( $this->value(), get_the_ID() ) . " value='" . get_the_ID() . "'>" . the_title( '', '', false ) . "</option>";
		}?>
		</select>
	<?php
	}
    }
}
Hence, we can simply generate custom control with its own HTML, CSS and JS code. Along with, encourage to do experiment with WP_Customize_Control class.
I am sure you found this article useful. Feel free to share your views, suggestions and queries in the comment section below.