
Hey techies
I am going to talk about Reactive Form with Validation in Angular 7 in this article.
Below is the step by step guide to apply validations on reactive form using Angular 7.
Step 1 – Command: ng generate component form
Step 2 – Go to file app.module.ts to import form modules as shown below:
import { BrowserModule } from '@angular/platform-browser';
import { NgModule } from '@angular/core';
import { AppRoutingModule } from './app-routing.module';
import { AppComponent } from './app.component';
import { FormComponent } from './form/form.component';
import { FormsModule, ReactiveFormsModule } from '@angular/forms';

@NgModule({
declarations: [
AppComponent,
FormComponent
],
imports: [
BrowserModule,
AppRoutingModule,
ReactiveFormsModule,
FormsModule
],
providers: [],
bootstrap: [AppComponent]
})
export class AppModule { }
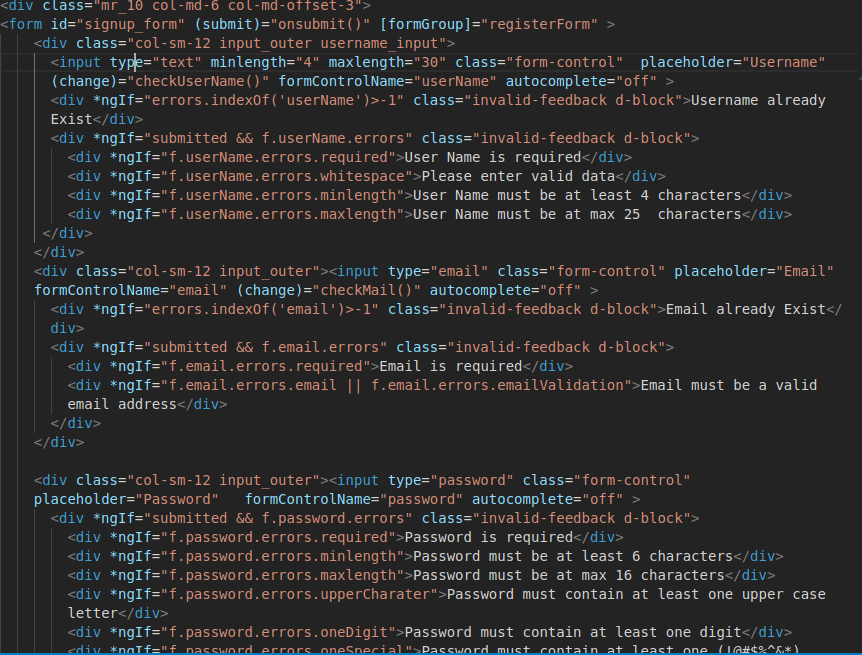
Step 3 – Go to file form.component.html to write form HTML in it:
Create a form in it as follows:
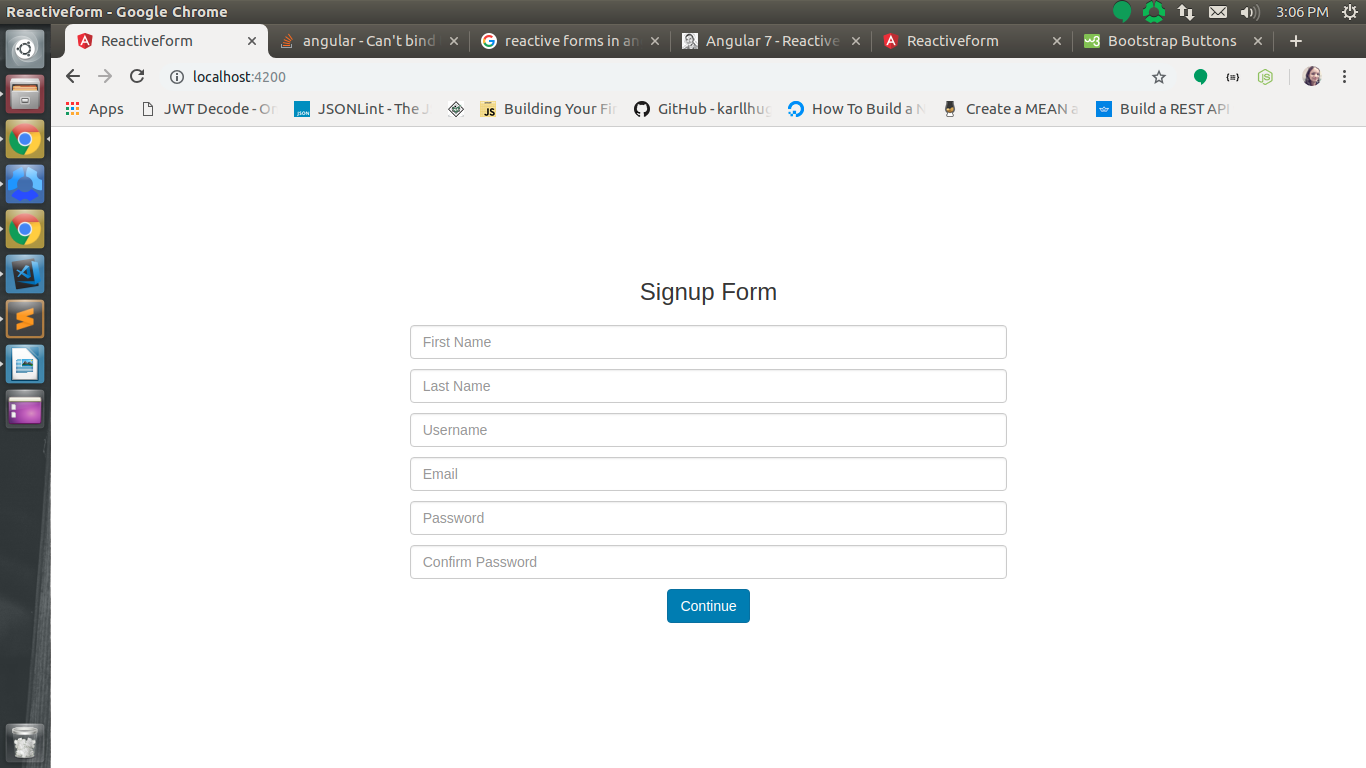
It will create a form as illustrated below:
Step 4 – Go to file form.component.ts:
Write the below-mentioned code to apply validations on the form:
import { Component, OnInit } from '@angular/core';
import { FormBuilder, FormGroup, Validators } from '@angular/forms';
import * as customValidation from './../custom-validator.service';

@Component({
selector: 'app-form',
templateUrl: './form.component.html',
styleUrls: ['./form.component.css']
})
export class FormComponent implements OnInit {
registerForm: FormGroup;
submitted: Boolean = false;
errors = new Array();

constructor(private formBuilder: FormBuilder) { }

ngOnInit() {
this.registerFormValidation();
}

registerFormValidation(): void {
this.registerForm = this.formBuilder.group(
{
firstName: ['',[Validators.required, customValidation.noWhitespaceValidator]],
lastName: ['',[Validators.required, customValidation.noWhitespaceValidator]],
email: ['',[Validators.required,Validators.email,customValidation.ValidateEmail]],
password: ['', [customValidation.validatePassword]],
cpassword: ['', [Validators.required]],
userName: ['',[Validators.required,customValidation.noWhitespaceValidator,Validators.maxLength(25),Validators.minLength(4)]]
},
{ validator: customValidation.confirmPassword });
}

get f() {
return this.registerForm.controls;
}

onsubmit() {
this.submitted = true;
if (this.registerForm.invalid || this.errors.length > 0) {
return;
}
this.submitted = false;
}
}
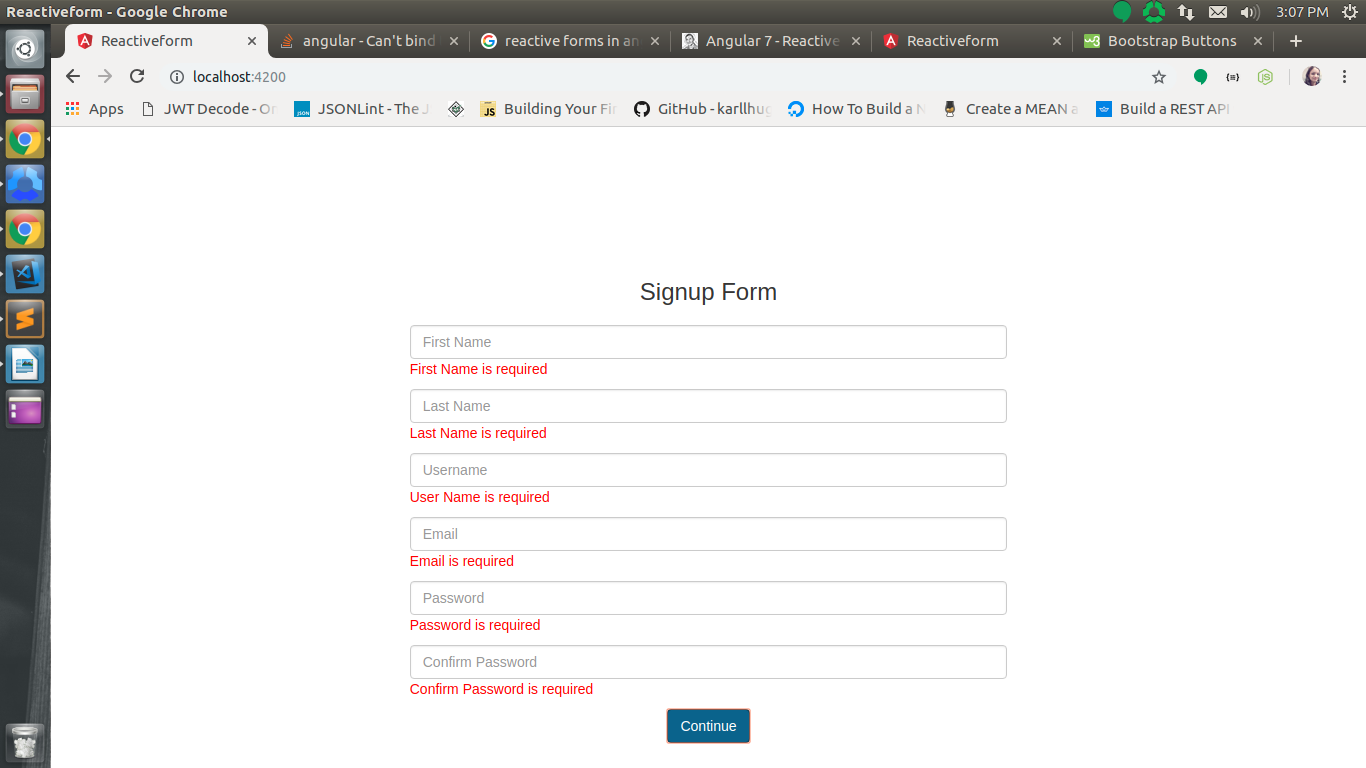
It will show validations as mentioned below:
Step 5 – Create a file custom-validator.service.ts in the app folder to apply custom validations on the form.
Go to custom-validator.service.ts file to apply custom validations as shown below:
import { AbstractControl, FormControl, FormGroup } from '@angular/forms';
export function ValidateEmail(control: AbstractControl) {
const re = /^\w+([\.-]?\w+)*@\w+([\.-]?\w+)*(\.\w{2,4})+$/;
if (!re.test(control.value) && control.value !== '') {
return { emailValidation: true };
}
return null;
}
export function validatePassword(control: AbstractControl) {
const re = /(?=.*[!@#$%^&*])/;
const upper = /(?=.*[A-Z])/;
const digit = /(?=.*[0-9])/;
const p = control.value;
if (p.length === 0) {
return { required: true };
}
if (p.length < 6) {
return { minlength: true };
}
if (p.length > 16) {
return { maxlength: true };
}
if (!upper.test(p)) {
return { upperCharater: true };
}
if (!digit.test(p)) {
return { oneDigit: true };
}
if (!re.test(p)) {
return { oneSpecial: true };
}
return null;
}
export function confirmPassword(group: FormGroup) {
const pass = group.controls.password.value;
const cpass = group.controls.cpassword.value;
if (cpass.length === 0) { return null ; }
return (pass !== cpass) ? {doesMatchPassword: true} : null;
}
export function noWhitespaceValidator(control: FormControl) {
if (control.value.length === 0) {
return { required: true };
}
const isWhitespace = (control.value || '').trim().length === 0;
const isValid = !isWhitespace;
return isValid ? null : { 'whitespace': true };
}
Thank you very much for taking the time to read my article, feel free to seek any further clarification.
Share it with your friends if you find it useful!