Restful API in Laravel using Passport With Authentication
Are you looking to create Restful API using Laravel? You’re at the right place, today we will learn how to build Rest API using Laravel passport.
Passport is a Laravel package that implements OAuth2 and JWT.
Passport is built to make full OAuth2 server implementation and use authentication for API based applications.
Laravel Installation for Rest API Project Setup
Laravel uses Composer to manage its dependencies. In order to use Laravel you need to make sure you have Composer installed on your machine.
Create-Project Via Composer
To install Laravel using composer, you need to run following command in your terminal:
composer create-project --prefer-dist laravel/laravel rest-api
In the above command rest-api is the name of the folder for a new Laravel project.
If you have already created a folder, then you can go to the folder path and run the composer command with folder name.
composer create-project --prefer-dist laravel/laravel
If you have PHP installed locally and you want to use PHP’s built-in development server to serve rest-api application, you can use the serve Artisan command. This command will start a development server at http://localhost:8000:
php artisan serve
Application Key
The next step you need to do after installing Laravel is to set the project application key. Application key is a random string and if installed Laravel via Composer or the Laravel installer, this key is already set. You can also set application key by using the following command
php artisan key:generate
Application key is 32 characters long string. You can set this key manually in .env environment file. Application key required for the security purpose if the key is not set, user sessions and other encrypted data will not be secure!
MySql Database Setup
Now you need to set up database connection with the application for this go to “.env” placed in the root directory and add the database credential.
It will look something like this
DB_CONNECTION=mysql

DB_HOST=127.0.0.1

DB_PORT=3306

DB_DATABASE=database

DB_USERNAME=root

DB_PASSWORD=123
Laravel Auth Setup
just Run the following commands to setup Laravel Authorization
php artisan make:auth
php artisan migrate
You can verify your application by hitting on the following URL.
http://your-app.test/register
If your application can register new users and registered users can log in to your application. It means everything works fine and you are ready to proceed with the next steps.
Laravel Passport Setup
Now is our main step, which is to install Laravel Passport in your application. It makes it easy to perform authentication for APIs and use tokens to authenticate users and do not maintain session state between requests. Laravel makes API authentication very easy using Laravel Passport, and it provides a full OAuth2 server implementation.
Run the following command in the composer to load passport
composer require laravel/passport
Once you hit the above command Passport registers its own database migration directory with the framework, and you need to migrate passport migrations in the database after installing the package. it will create new tables in your application to store clients and access tokens:
php artisan migrate
Next, you need to run the passport:install command. This command will create the encryption keys needed to generate secure access tokens. In addition, the command will create “personal access” and “password grant” clients which will be used to generate access tokens:
Next, you need to run the passport:install command. It will create the encryption keys needed to generate secure access tokens.
php artisan passport:install
Now that you are done with the installation part, you need to configure Passport with Laravel Auth.
Just open User modal class placed in app folder, add the Laravel\Passport\HasApiTokens trait to your App\User model.
Just open User modal class placed in app folder, add the Laravel\Passport\HasApiTokens trait to your App\User model.
<?php

namespace App;

use Laravel\Passport\HasApiTokens;

use Illuminate\Notifications\Notifiable;

use Illuminate\Foundation\Auth\User as Authenticatable;

class User extends Authenticatable

{

    use HasApiTokens, Notifiable;

}
Now add Passport routes to AuthServiceProvider by going to app/Providers in your application and opening AuthServiceProvider.php file.
<?php

namespace App\Providers;

use Laravel\Passport\Passport;
use Illuminate\Support\Facades\Gate;
use Illuminate\Foundation\Support\Providers\AuthServiceProvider as ServiceProvider;

class AuthServiceProvider extends ServiceProvider
{
    /**
     * The policy mappings for the application.
     *
     * @var array
     */
    protected $policies = [
        'App\Model' => 'App\Policies\ModelPolicy',
    ];

    /**
     * Register any authentication / authorization services.
     * @return void
     */

    public function boot()
    {
        $this->registerPolicies();
        Passport::routes();
    }
}
Now, go to the config folder and open the auth.php file, in this file you need to set the driver option of the API authentication guard to passport and your application will use Passport’s TokenGuard when authentication requests will come from API.
'guards' => [

    'web' => [
        'driver' => 'session',
        'provider' => 'users',
    ],

    'api' => [
        'driver' => 'passport',
        'provider' => 'users',
    ],
],
Create API Routes
Now you need to set routes for API requests, to do this go to routes folder and open api.php file and paste the following code to your api.php file.
<?php
use Illuminate\Http\Request;

Route::group([

   'prefix' => 'auth'

], function () {

   Route::post('login', 'AuthController@login');

   Route::post('signup', 'AuthController@signup');

   Route::group([

     'middleware' => 'auth:api'

   ], function() {

       Route::get('logout', 'AuthController@logout');

       Route::get('user', 'AuthController@user');

   });

});
Now you need to create a new controller for API methods. In this tutorial, I have created AuthController you can use any name as per your requirements or just create an AuthController and paste the following code in order to test user login, register functionality
<?php
namespace App\Http\Controllers;
use Illuminate\Http\Request;
use Illuminate\Support\Facades\Auth;
use Carbon\Carbon;
use App\User;
class AuthController extends Controller
{
/**
* Create user
* @param [string] name
* @param [string] email
* @param [string] password
* @param [string] password_confirmation
* @return [string] message
*/
public function signup(Request $request)
{
$request->validate([
'name' => 'required|string',
'email' => 'required|string|email|unique:users',
'password' => 'required|string|confirmed'
]);
$user = new User([
'name' => $request->name,
'email' => $request->email,
'password' => bcrypt($request->password)
]);
$user->save();
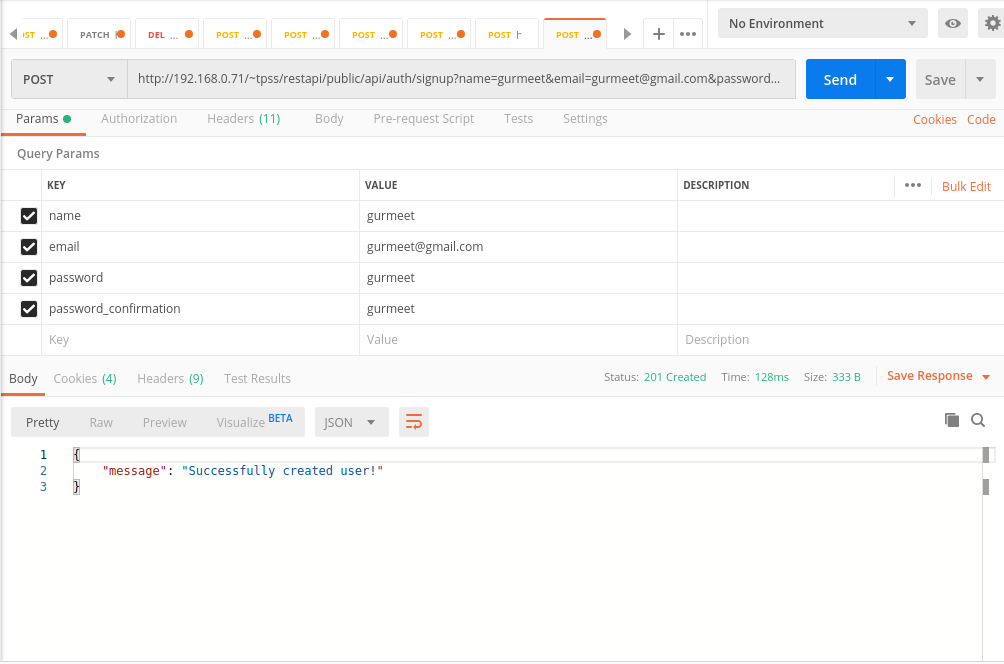
return response()->json([
'message' => 'Successfully created user!'
], 201);
}
/**
* Login user and create token
* @param [string] email
* @param [string] password
* @param [boolean] remember_me
* @return [string] access_token
* @return [string] token_type
* @return [string] expires_at
*/
public function login(Request $request)
{
$request->validate([
'email' => 'required|string|email',
'password' => 'required|string',
'remember_me' => 'boolean'
]);
$credentials = request(['email', 'password']);
if(!Auth::attempt($credentials))
return response()->json([
'message' => 'Unauthorized'
], 401);
$user = $request->user();
$tokenResult = $user->createToken('Personal Access Token');
$token = $tokenResult->token;
if ($request->remember_me)
$token->expires_at = Carbon::now()->addWeeks(1);
$token->save();
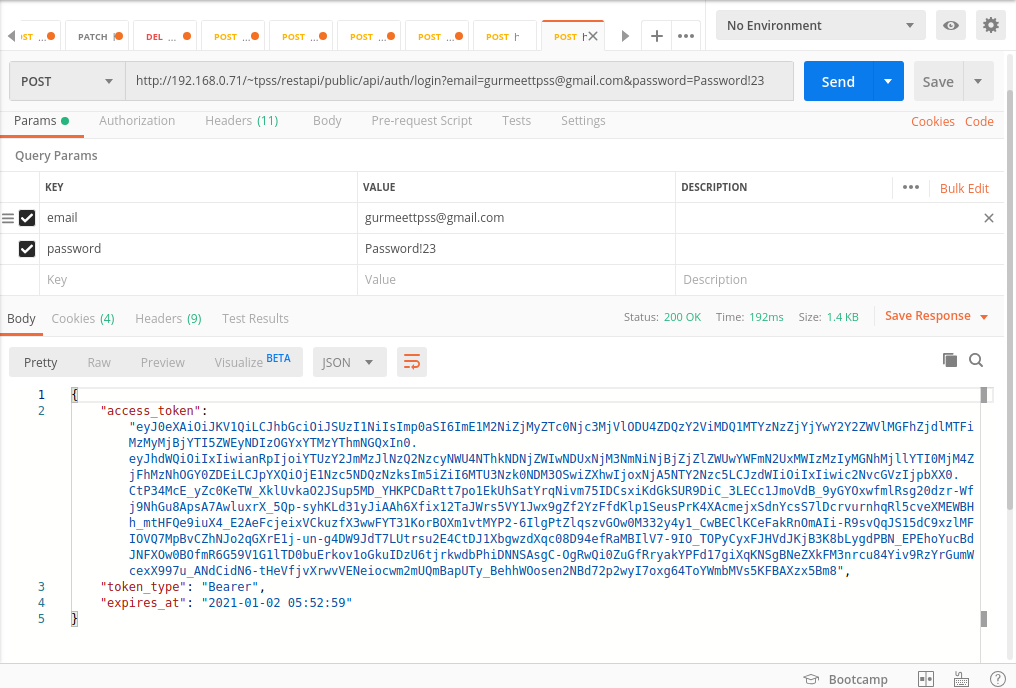
return response()->json([
'access_token' => $tokenResult->accessToken,
'token_type' => 'Bearer',
'expires_at' => Carbon::parse(
$tokenResult->token->expires_at
)->toDateTimeString()
]);
}
/**
* Logout user (Revoke the token)
*
* @return [string] message
*/
public function logout(Request $request)
{
$request->user()->token()->revoke();
return response()->json([
'message' => 'Successfully logged out'
]);
}
/**
* Get the authenticated User
*
* @return [json] user object
*/
public function user(Request $request)
{
return response()->json($request->user());
}
}
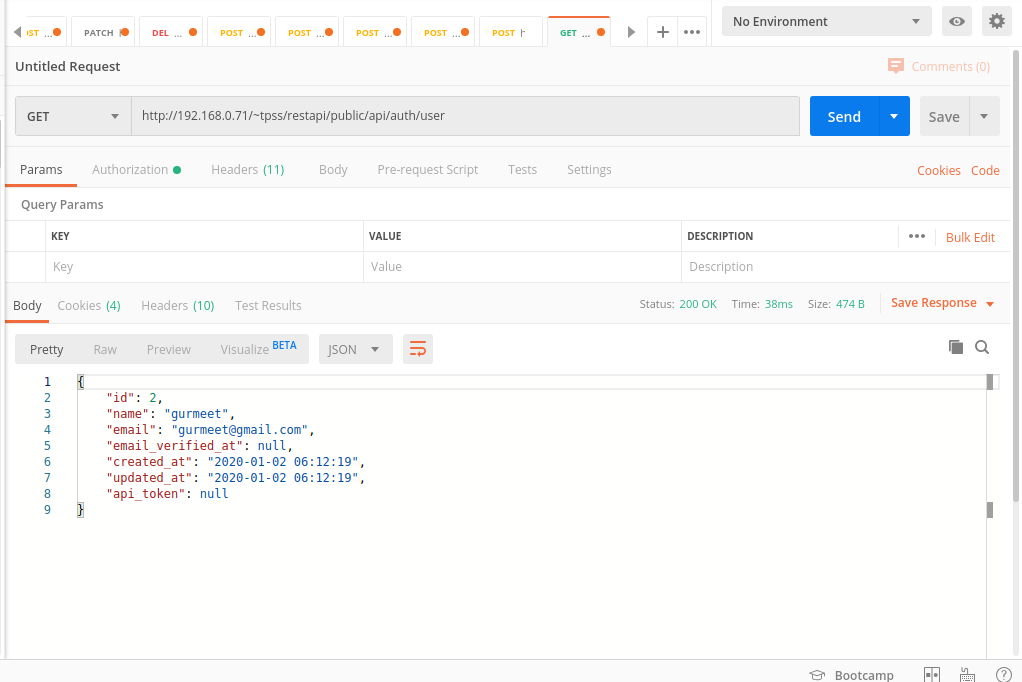
Now you can use Postman or any other Rest Client Tools. I prefer Postman to test and shared working screenshots.
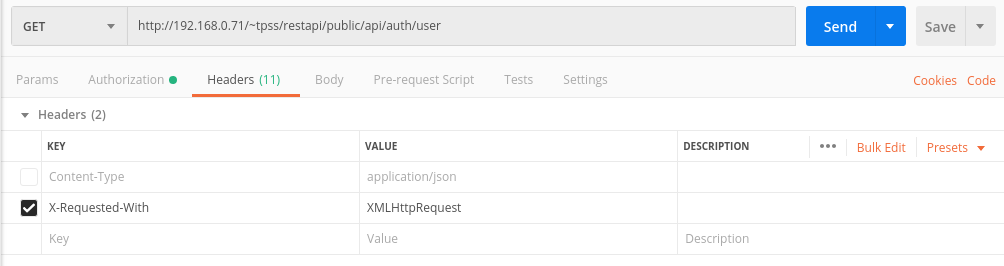
In order to use API you need to set two headers as listed below
Content-Type: application/json

X-Requested-With: XMLHttpRequest
Signup
Login
User Info
Thank you very much for taking the time to read my article, feel free to seek any further clarification.
Share it with your friends if you find it useful! Share your views and queries in the comment section below.
If you have any queries or doubts about this topic please feel free to contact us. We will try to reach you take your API development to the next level!